When making your own three point hitch for your garden tractor you can save money and often come up with something that is just as effective as if you bought a tractor with a three point hitch to begin with.
This tutorial will give you more versatility for your attachments than factory made tractors. With some simple materials and welding you can create a system that allows your attachments to effortlessly come off and on!

Table of Contents
What Will You Need To Make A Three Point Hitch For Your Garden Tractor?
- Centre point hitch (if not already there)
- Robust tool to drill holes in metal
- Strong, metal (can be scrap or bought)
- Strong chains
- Two or three rods with threaded ends (depending on lower lever placement)
- Welding machine (optional but will make things easier)
- Metal Lever able to be drilled
Step by Step – How To Make A DIY Three Point Hitch
When starting to design your three point hitch, you need to establish what your tractor already comes with. Sometimes, it may already come with two lower links or a centre link but is missing one or the other.
Feel free to skip ahead to where in the tutorial is most relevant to you.
Let’s assume your tractor doesn’t come with anything to do with a three point hinge and just has a lower piece of metal like in the example.
This is the most basic format you could buy a tractor in and could be due to you making your tractor from scratch or it being an older model.
Step 1: Find A Hinge Point For The Two Lower Levers
The first thing you should do when creating the lower levers is find a suitable place to drill a hole in your tractor to make the hinge that will fit the lower links of the three point hinge.
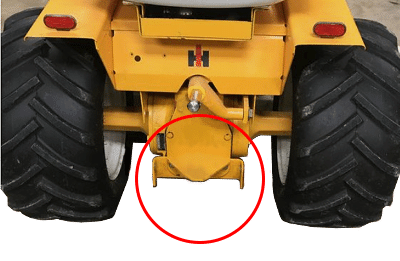
Find the point on your tractor that is furthest to the ground and to the back of the tractor.
In most cases you should find a position like the example below, where there is a strong piece of metal at least a couple of inches thick that you can drill a hole about an inch thick for.
Finding a place similar on your tractor would be ideal.
Step 2: Drill A Hole In The Tractor Base
Once you have found a suitable hinge point, you have to create a circular hinge to lever the lower hitches on to.
This can be one hinge for both of them that goes all the way through the base of the tractor or it could be two separate hinges for each side like in the example.
You may find it easy to remove this part of the tractor, drill the hole and add it on.
However, if this is inconvenient or not possible, you could drill the hole using a handheld or industrial drill straight into the tractor.
The thicker and harder the metal you are drilling through, the slower you will have to drill. You do not want to damage your appliance or create faults in the metal that could compromise you build later on.
A hole that is about an inch thick would be ideal but if you are using a bigger tractor you may want to go bigger and use a bigger circular hinge.
What you will be using your tractor for is entirely up to you so the size and strength of materials can be changed.
If unsure, it would be wise to go on the bigger end of the spectrum to prevent your three point hinge being damaged or limiting the jobs you can do on your tractor overtime.

Step 4: Insert Circular Rods For The Holes
The reason why it is important to buy your rod rather than weld this feature is because you want buy a rod with threaded ends so you are able to screw in bolts to the ends.
The rods also need to be able to rotate freely within the holes.
This is essential in keeping the lower arms of the three point hitch in place yet still ensuring they are able to rotate up and down as the height of the hitch is adjusted. This makes implements able to move parallel to the floor
A great way is to screw in some secure nuts to fill in any gaps and ensure the arms don’t scrape the tractor and then add a nut that caps the end of the rod so the arms do not fall off.
Just be sure to leave a big enough gap between the spaces of the nuts to attach the two lower levers.
You may find it beneficial to design the lower levers first and come back to this step once you have the dimensions.
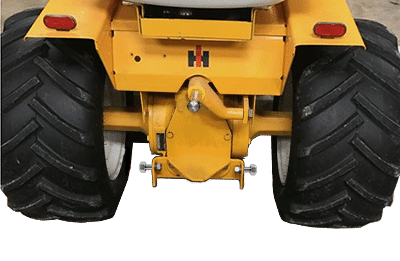
Either way, this is what your base should look like once you have inserted the rods in to the holes with gaps in the middle for the arms.
In this example, rather than having one long rod it makes more sense to have one on either side that are the exact same length.
Step 5: Attach Two lower Arms
When choosing what your lower levers will look like, They can be about 40cm in length and it is up to you whether you prefer them to bend at 45 degrees towards the end like in the example or not.
Either way, when constructing your lower limbs make sure the steel you are using is at least an inch thick to ensure it is strong enough to withstand loads during your tractors use.
As discussed in the previous step, add them in between the nuts of the rods so the fit is snug but the lower arms do not scrape the side of the tractor. or become too stiff.
When making your arms. It is crucial to remember to create holes in the ends of the arms that are both the same size as the width of the rod with threaded ends you used to add to the tractor.
You don’t want the holes of the arms to be too big and create rattling and excessive movement but you don’t want the holes to be too small either and scrape the rod as the arms rotate back and forth.
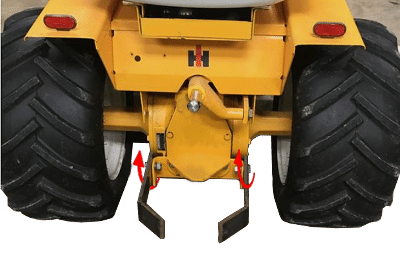
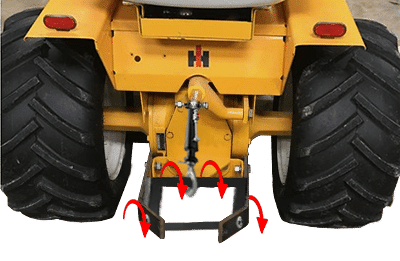
The movement of the lower arms is shown in the example. You want them both to be able to freely rotate.
Step 6: Create A Centre Link Hole
Now you are done assembling the lower levers of the hitch, the start of the centre hitch is made by first drilling in a hole for another hinge in the same way you did before.
Find a point about 50cm above the lower levers and drill the hole on the same horizontal plane as the lower levers.
If you can find a point where there is a clear point to add in a centre hinge then use that but if not you may need to add in a hinge and attach the centre hitch from two points.
This is where you need to plan ahead and get creative based on the type of tractor you have and your personal preference.
The back end of every tractor is different so make sure you give this some thought so you don’t end up making more holes than necessary.
When all is planned out, the hole should be about an inch wide just like the lower levers.
Furthermore, like the previous steps, when drilling through metal make sure you drill slowly so as to not damage your equipment or the metal of the tractor.
In the example, a relatively straight forward spot for the centre link to attach to is used.
Step 7: Attach Rod With Threaded Ends And Nuts To Go With It
In the same way as in the lower levers, buy a rod with threaded ends that is the same diameter as the hole you have drilled so the rod is rotate freely in the hole with little movement.
Also, make sure the length of the rod fits the length of the hole you have drilled so you can fit the centre rod properly.
Fill in the rod with nuts to fill gaps and nuts to cap the end of the rod by rotating them in to the rod threading.
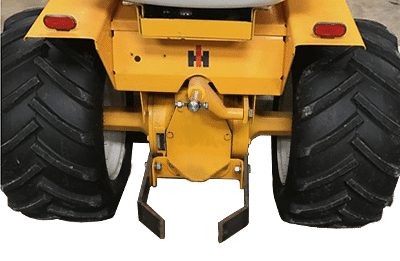
When you are finished here all you should be left with is a suitable gap to fit in the centre link of the three point hitch which fits exactly in the middle of the two lower arms.
In the example, the only way to make the centre hitch fit exactly in the middle of the tractor was to design the centre link with two arms that attach either side of the rod.
You may have a set up that makes things more or less complicated but it is crucial the centre link fits exactly in the middle of the hitch – exactly in between the lower arms.
Step 8: Attach Your Centre Link
When looking at purchasing or welding you own centre link, make sure your link has a hole on either side of the rod and is strong enough.
A good guide to go by is to find a rod at least two to three inches in diameter that is able to fit in an inch rod either side.
Once you have decided on one, add it in to the threaded rod adding in nuts on either side to secure the rod but make sure it’s not too tight to stop the centre link from turning either.
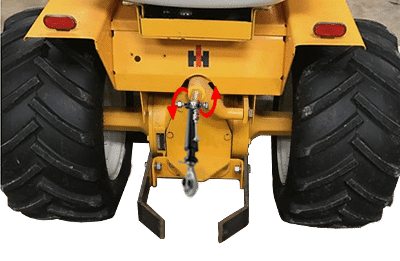
You should now have your centre link able to turn above two lower levers.
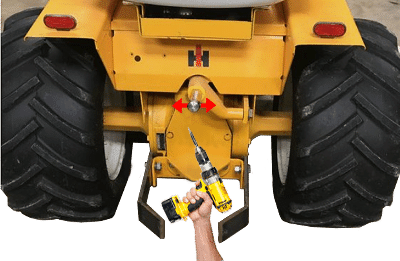
In the example, because of the complexity of having two attachment points for the centre link either side of the rod, the centre link had to be welded.
However the concept is the same and you should be left with an arm that rotates back and forth like in the example, mirroring the movement of the lower arms in the previous steps.
Step 9: Connect The Centre Link And Lower Levers
There are multiple ways to connect you lower levers to your centre link. Some of the most popular ways is to create an upside down T shape or a rectangle shape seen below.
Either way, it is important to connect them so when you move the height of the hitch around, the ends move together and the implement you attach to your hitch remain parallel to the floor.
Whatever arrangement you go with, make sure the frame is able to rotate independently of the arms of the hitch as mentioned as this is crucial in the functionality of your tractor implements.
To make sure the frame moves independently, make sure it is attached to holes in the lower arms you will need to drill and the hole in the centre link.
As the three arms move up and down, the frame will also move, remaining upright and keeping your tractor implements stable.
Creating Something To Raise The Three Point Hitch
Depending on what type of tractor you have, this step can be amended
Some tractors come with one hydraulic that is able to be powered by your tractor. Some tractors come with two.
However, assuming you’re tractor comes with nothing attached, a great way is to manually create a lever to lift up the three point hitch so you are able to adjust the hitch height to where you want.
This is what we will be discussing in the next few steps so you can create your three point hitch entirely from scratch without any prior machinery being fitted to your tractor.
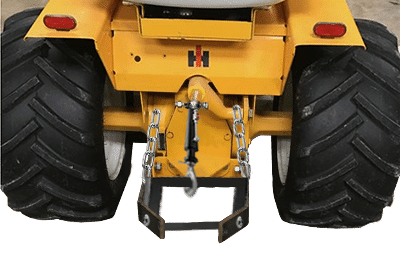
Step 10: Attach Chains To The Lower Levers
In order to move the lower levers up and down, the first step is to attach chains to both of the lower arms. You can do this by buying chains or making them and attaching them to the lower levers by making a hole nearer the base of the arms and attaching them.
The chains will not need to be too long but if you are not sure how long exactly, it is better to overestimate and cut off any extra chain later on.
It is very important in this step that you drill holes to attach the chains at the same length on each of the arms.
If this measurement is off it will result in the frame of the three point hitch being wonky and one side being lower to the ground than the other.
Take you time with this step and focus on accuracy!
Step 11: Create A lever
Now you have added in chains to the lower arms, you need to attach a lever to the chains.
This step is very much dependent on the type of tractor arrangement you have. First, you need to find another place to drill a hole parallel to the floor and perpendicular to the centre hitch to create a point of leverage.
You may be able to add this in to the same hinge you attached the centre link to like in the example.
However, adding in another hole and rod just in front or behind the centre link connection point also works well.
On one side of the rod, attach a lever. The longer this piece of metal is the easier you will find it to raise your three point hitch.
You may want to play around with this as changed in the weight of metal and the placement of the chains in the previous step could make your hitch more or less easy to raise.
Make sure you don’t have to use excessive force every time you need to adjust something!
It is also worth thinking about drilling a hole in the lever which will act as a hole you can place a pin in to. This will make more sense in the next step.
If you have set this up correctly, as you turn the lever, the chains will coil up around the rod and pull up the lower arms of the three point hitch and hence the centre link too as it is attached to the lower arms by the frame.
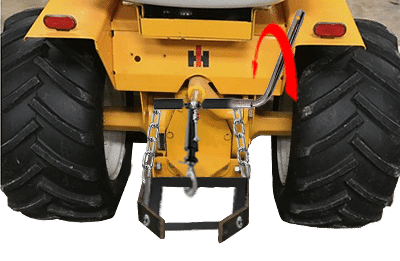
Step 12: Create A Series Of Adjustable Resting Points For The Lever
The final step of completing your three point hitch is to create the part of the lever that keeps the hitch stable at a certain height.
The easiest way to do this is to get a thick piece of ideally curved metal and weld it to your tractor parallel to the long lever arm of the tractor.
This piece of metal has to be exceptionally strong as it will support the entire weight of the hitch and any of the load carried by the implements that attach to it.
Once you have this welded in, find the hole in the long lever arm you made in the previous step and track where this arm traces the piece of metal.
There should be a circular arc that is traced as a result of the hole of the long arm turning as the three point hitch is raised up and down.
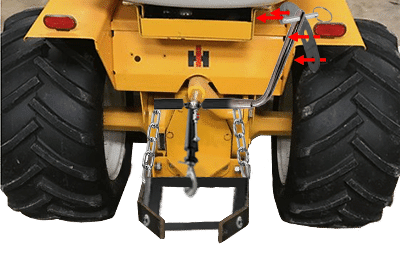
From here, you can drill in a series of holes up to your preference. The more holes there are, the more variations of height you will be able to keep your three point hitch at.
As you can see from the example, there are five points where the pin can be slotted in. The furthest point away will result in the highest point of the three point hitch.
And the lowest point that three point hitch can be adjusted to will be the arrow that appears closest to you.
In the example, the pin is in a neutral position in the centre hole. Pinning the hitch up and down will be extremely useful for you to create a range of positions and variations for you tractor implements to work on.
You could also drill the holes based on the implements you know you will be using for your tractor if you know you will be using it for only one or two uses.
Conclusion
There you have it! To wrap some things up that are worth noting:
- You may need multiple trips back and forth to a hardware store as you collect all your bits for the job. Don’t be afraid to do things as you go as it is likely your plan will change along the way.
- In addition, getting hold of a welder would be ideal as if not. you will have to stick to cutting out already bought or found pieces of metal. Restricting what you can do and the shapes you can make.
- Remember to cut metal with the right tools and to cut slowly if the metal is particularly strong and thick. It often takes patience to craft the perfect hitch!
But once all is clear, setting up your own three point hitch is a great way to save money and immerse yourself in a cool project resulting in a versatile three point hitch tailored to you.
You can then use it to create your own tractor implements too that easily pop an and off your hitch.