So you’re sick and tired of stubbing your toe on your downspout extension and manoeuvring around it whenever you cut the grass and attempt to use your garden.

This problem is easy to fix! Adding a hinged downspout extension will allow you to enjoy your garden a lot more by getting the unnecessary clutter out of the way. So with your downspout hinge armed at the ready – let’s tackle this
Table of Contents
What tools will you need to make a hinged downspout extension?
Before you get started, make sure you have the following items. Not installing your downspout extension hinge properly due to having the incorrect equipment could be detrimental.
It may start leaking and cause soil saturation problems you tried to avoid in the first place! If you don’t have all the tools needed, consider doing a DIY downspout extension that requires less equipment.
- Heavy duty scissors or shears
- Screws (may come with downspout hinge)
- Velcro pair
- Manual or electric screwdriver
- Downspout hinge
Of course if you don’t yet have your downspout extension then you will need to buy one of those too!
How to install a hinged downspout extension step by step
Before you start working away, make sure it isn’t raining for the obvious reason that you will have water running out of your spout as you fix it. Check the weather forecast to make sure!
Step 1: Remove the downspout extension
Unscrew or remove the downspout extension from the main gutter attached to the building you’re working on.
At this stage, you need to ensure the main extensions’ end fits inside the mouth of the downspout extension. Making sure there are no annoying leaks as water flows
Get a mallet, hammer or even pliers to open up or close the mouths of either gutter accordingly. The gutter attached to your house should be able to swallow up the gutter extension comfortably. This will make more sense later.
Step 2: Paint the downspout hinge if necessary
We all like a bit of colour coordination now don’t we? This is where you introduce your spray paint or your outdoor paint to make sure the hinge matches the colour of your gutter.
Of course, there is no practical use for this step but bear in mind. Once this is installed you’d have to live with the permanency of having a mismatch of colours on your gutter.
For some it’s no big deal, for the detail oriented, simply unacceptable!
Step 3: Mark your downspout hinge
Planning out where you’re going to cut is key to cutting the downspout hinge accurately so this is arguably the most important step.
The shape you’d need to cut out would be almost an “S” shape with tight curves when looking from the side of the downspout. Like below.
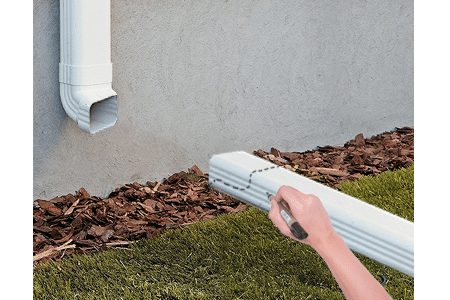
Mark this line with a pencil or felt tip for cutting later on. You could easily do this freehand but don’t shy away from using a ruler or straight edge for ultimate accuracy.
Step 4: Cut your downspout hinge
Here comes the fun part, cut through the metal downspout extension with your shears or scissors. Depending on how thick your spout is, you may need to apply more or less pressure.
Follow along your cut line the best you can. Not being accurate here could cost you extra materials or just cause you a headache. So take your time.
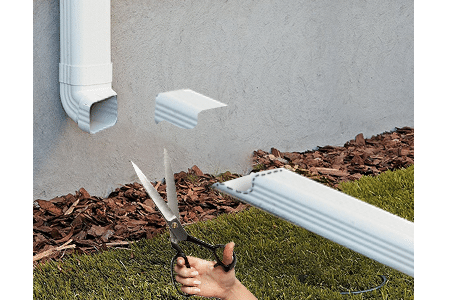
Tip: Be careful not to slip and cut your hand on the freshly cut aluminium edge. It gets sharp. I think you’d agree installing your downspout hinge beats installing stitches in your hand later!
Please, please be careful.
Step 5: Screw in the hinge to the main gutter
This is where everything comes together. Add in the hinge of the downspout to your fixed in gutter first. Use the screws that come in the pack or your own.
Two screws on either side of the hinge or at the top should do the trick but there’s no harm in using all the available holes and screws to keep it secure.
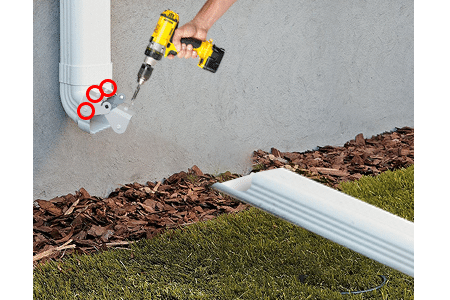
Depending on what type of hinge you’ve got, you may have some useful flaps that slot underneath the gutter to keep it in place before you screw it in.
But by no means are these necessary.
Step 6: Screw in the hinge to the extension gutter
Now comes the other half of the downspout, the extension. Simply screw it in the same way with two screws either side.
Beforehand, you could quickly double check that the water flows the right way and everything fits how it should before permanently screwing it in.
Spray your hose on top of your roof to generate a channel of water to get testing how effective it is.
To test the moving mechanism, bend your downspout extension up and down to see if there are any obstructions or bits of gutter you still need to cut out to get a smooth movement.

And of course – don’t make the silly but doable mistake of screwing in your downspout the wrong way round!
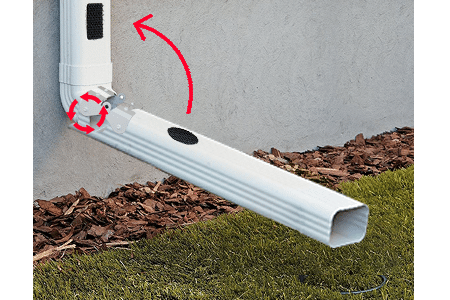
Step 7: Add velcro to keep downspout extension in place
So all the hard manual labour is done and you just need to align some sticky Velcro to your downspout to keep it upright against the wall while the downspout is erect.
If your downspout extension comfortably stays in place against the downspout on your wall then this step isn’t really necessary.
But from a safety perspective, a gust of wind coming along and blowing down your propped up downspout extension that is solely secured by gravity isn’t ideal.
But that’s the final step. Congrats, your hinged downspout extension is properly in place!
Why install a hinged downspout extension?
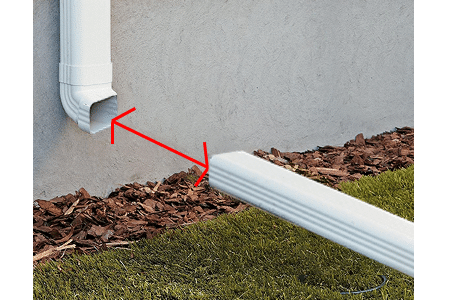
When a hinged downspout extension is needed, chances are it is covering an area in your garden that you need access to.
If you install a hinged downspout extension you’d be able to conveniently bend the extended pipe upwards and rest it against the main pipe, clearing the ground for whatever activity you need to do.
With the new instalment you can cut your grass using a lawn mower and use the space for outdoor sports and recreation without a trip hazard!
Maybe you can prevent your mulch or mulch edging from washing away with this new gadget.
Very clever – so long as you put back down the downspout when you’re finished or water will drain out of the hinged end of the downspout rather than the exit of the downspout extension.
Straight into the base of your house as it rains and foregoing the whole purpose of installing a downspout extension in the first place!